Saturday, February 11, 2006
The slab

They've poured the slab.
The slab turns out to be complicated. It's thick (15 inches, I think) around the edges (I suppose because that's the part that holds the house up). Except right around the edges, though, most of the space not concrete, but rather is insulation, with just four or five inches of concrete on top.
Around the perimiter are the sill plate bolts. You can see them in the picture above, and you can see one here:

They are bolts--the threads are just covered with duct tape so they don't get damaged. Once the frame of the house is constructed, it will be bolted to the slab using these bolts.
(The framing material for the house has arrived, just a couple of days after I took these pictures.)
There are some drain tiles that run from the front of the house to the back (which is the way the grade runs anyway). I didn't get any pictures of them.

You can see several layers of stuff here. The clear plastic is between the concrete and the exterior insulation. It will be threaded up onto the slab as the frame goes up, to provide one more barrier to cold air getting in. The black material running along off the slab, but on top of the exterior insulation, is a root barrier. It's supposed to help protect the insulation and the drain tiles from roots. I didn't get a good close up, but it's a woven fabric that water permiable, but a barrier to roots.
The backfilling of dirt to cover all this stuff has already started, as you can see on the left-most part of this picture.
Tuesday, February 07, 2006
The slab pre-pour
Got a note from Mike Kernagis:

Here's the slab shortly before they poured the concrete. You can see the plastic vapor barrier on top of the foam, and how all the joints and plumbing protrusions are taped. This vapor barrier serves two purposes, 1. it prevents moisture transfer from the ground to the slab, and 2. it prevents the concrete from sticking to the foam, allowing for the removal and reuse of the foam if the house is ever demolished. At the date of this picture, January 26, the rebar is in place in the deep parts of the form, but the re-wire is not in place for the thin part of the slab.
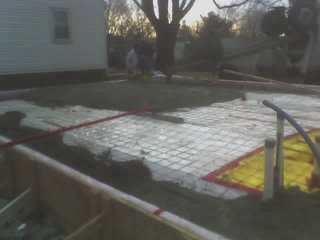
For the past three weeks or so the formwork has alternated between a swimming pool and an ice rink. I would get it pumped out only to see it fill with rain or snow again. FINALLY, last week was dry and warm enough that I could lay down and tape plastic, bend and set in the re-bar and mesh, and thoroughly brace and level the form.

Here's the slab shortly before they poured the concrete. You can see the plastic vapor barrier on top of the foam, and how all the joints and plumbing protrusions are taped. This vapor barrier serves two purposes, 1. it prevents moisture transfer from the ground to the slab, and 2. it prevents the concrete from sticking to the foam, allowing for the removal and reuse of the foam if the house is ever demolished. At the date of this picture, January 26, the rebar is in place in the deep parts of the form, but the re-wire is not in place for the thin part of the slab.

Friday morning our concrete finishers went to work. Kat and I measured out and set our sill plate bolts as the concrete started to set up. The concrete guys finished and sealed the slab and will be cutting a couple of control joints with in the next day or two.
![]()